Hosting multiple sites or applications using Docker and NGINX reverse proxy with Letsencrypt SSL
So I decided to rehost my homepage and a couple other web pages and apps on a new server. And since we’ve been using Docker and Compose for some projects at work, I thought, hey, this could be a neat clean setup for multiple apps hosted on a single machine without installing a ton of local dependencies and managing everything by hand. Here’s the story of how this went down, what I learned along the way, and how you can build the same setup without doing the same mistakes that I initially did.
Getting the hardware Link to heading
First thing you need to run anything on the web is a server of some sort. Yes, yes, serverless is all the rage right now, but we’re not going there.
There are all sorts of server setups available for all sorts of purposes and with all sorts of price tags. As a first step, I compiled a basic list of requirements for the kind of hosting I thought I’d need. It would be serving mostly static pages, with a few more dynamic apps with some background processes doing data collection and talking to some APIs, but there’d be no significant processing or other heavy lifting in there. So these were the basic min specs for the server I came up with:
- single CPU (won’t be doing anything CPU-intensive, so why have more)
- 2-4GB RAM (same reasoning)
- 20GB or more storage (I’ll need to serve some static content, so less than that won’t do)
- IPv6 enabled (necessary for some of my projects that I might tell about at some point)
- recent Linux kernel that’ll support Docker properly (surprisingly common issue with cheap VPS setups, as I found out)
After researching the market a bit, I arrived at the conclusion that an entry-level VPS at a local provider here in Germany is probably what I want. There are many providers available out there and they change up their offerings rather fast, so I won’t name any specific ones here - hit me up on Twitter if you want to know which one I ended up with.
A noteworthy alternative to a VPS is Amazon EC2. I actually used their free-tier t2.micro instance for a while to test
an early iteration of this very setup, and it did the job perfectly. Of course, those are only free for 12 months - but if you
just want to test the setup and possibly move to a different server later (or continue running on EC2, although that’s considerably
more expensive), it’s something I can recommend.
DNS Link to heading
You can run the applications under any domains or subdomains you like, provided their DNS is pointed to the server you have set up.
I personally run all applications as subdomains (and root domain) of olex.biz. The DNS is setup with A records for olex.biz
and *.olex.biz pointing directly to the server’s IP. This way I can choose any subdomains for new apps I want to deploy, and
don’t have to update DNS records every single time.
Setting up the software Link to heading
Base OS and Docker Link to heading
For my VPS, I chose to run an Ubuntu 18.04 image offered by the VPS provider. You may choose whichever distro you’re familiar with - the only requirement is that it can run Docker. Get it installed and configured as you would configure any Internet-facing server - SSH with public key auth only, no root login, fail2ban, the usual setup. Important thing is at the end you have a working server with Docker and Compose available.
NGINX reverse proxy and SSL Link to heading
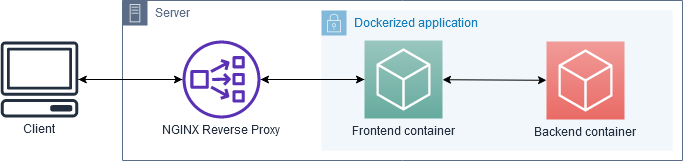
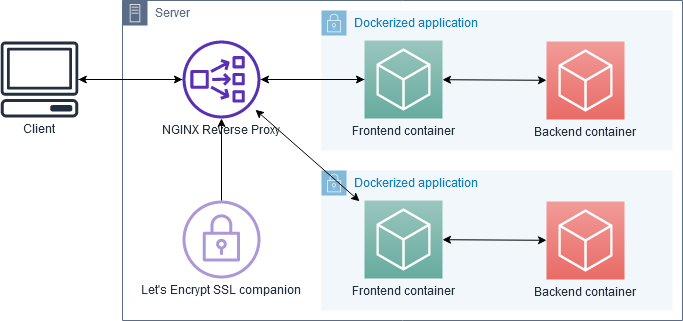
The NGINX reverse proxy is the key to this whole setup. Its job is to listen on external ports 80 and 443 and connect requests to corresponding Docker containers, without exposing their inner workings or ports directly to the outside world. Additionally, with the SSL companion container the proxy also automatically redirects all HTTP requests to HTTPS and handles SSL encryption for all traffic, including certificate management.
For this job, I use jwilder/nginx-proxy and
docker-letsencrypt-nginx-proxy-companion.
My docker-compose.yml for them is placed in /home/olex/proxy and looks like this:
version: '2'

services:
  nginx-proxy:
    image: jwilder/nginx-proxy
    container_name: nginx-proxy
    ports:
      - "80:80"
      - "443:443"
    volumes:
      - conf:/etc/nginx/conf.d
      - vhost:/etc/nginx/vhost.d
      - dhparam:/etc/nginx/dhparam
      - certs:/etc/nginx/certs:ro
      - /var/run/docker.sock:/tmp/docker.sock:ro
    networks:
      - proxy
    restart: always

  letsencrypt:
    image: jrcs/letsencrypt-nginx-proxy-companion
    container_name: nginx-proxy-le
    volumes_from:
      - nginx-proxy
    volumes:
      - certs:/etc/nginx/certs:rw
      - /var/run/docker.sock:/var/run/docker.sock:ro
    restart: always

volumes:
  conf:
  vhost:
  dhparam:
  certs:

networks:
  proxy:
    external:
      name: nginx-proxy
Let’s go through some details here to understand what’s going on. There’s two services, nginx-proxy and letsencrypt, as
well as some volumes and a custom external network specified here.
nginx-proxy Link to heading
nginx-proxy has a couple things happening:
Its ports 80 and 443 are forwarded to the host, making it Internet-facing. No other containers we run on this machine will need their ports forwarded, all communication from and to the outside will be proxied through here - hence “reverse proxy”.
Various NGINX configuration directories are mounted as named volumes to keep them persistent on the host system. Those volumes are defined further down in the file.
/var/run/docker.sockfrom the host is mounted. This allows the proxy to listen in to other containers starting and stopping on the host, and configure NGINX forwarding as needed. Containers need to present their desired hostnames and ports as environment variables that the proxy can read - more on that further below.Finally, the container is assigned to a
proxyexternal network, which is described below.
letsencrypt Link to heading
letsencrypt is a companion container to nginx-proxy that handles all the necessary SSL tasks - obtaining the required
certificates from Let’s Encrypt and keeping them up-to-date, and auto-configuring nginx-proxy to transparently encrypt
all proxied traffic to and from application containers.
It’s connected to nginx-proxy by sharing its volumes (volumes-from: directive). It also listens in on the host’s
/var/run/docker.sock to be notified when application containers are started, and to get the information from them to obtain
the necessary SSL certificates.
Note that this container doesn’t need to be put in the external network - it gets by only using the shared volumes and Docker socket, and never needs to talk to the outside world or another container directly.
External network Link to heading
Last but not least, there’s the external network. To understand why you might need it, you need to know how docker-compose handles networks by default:
For every application that is run using its own
docker-compose.yml, Compose creates a separate network. All containers within that application are assigned only to that network, and can talk to each other and to the Internet.We want to deploy multiple applications on this server using Compose, each with their own
docker-compose.yml, and proxy them all to the outside world via ournginx-proxycontainer.No other container can access containers within a default network created by docker-compose, only those inside the application’s own
docker-compose.yml. This makes life difficult fornginx-proxy.To work around this, we create a single network outside of Compose’s infrastructure, and place our
nginx-proxycontainer in that network. To do this, we need to define this network asexternalin thedocker-compose.yml- this way Compose will not try to create the network itself, but just assign the containers it creates to the existing outside network.If we try to run this as is, Compose will error out telling us the external network doesn’t exist.
We need to initially create the proxy network manually with:
sudo docker network create nginx-proxy
Now we can run our proxy container and SSL companion:
sudo docker-compose up -d
And continue with deploying at least one application behind the proxy to see that it actually works.
Running applications behind the proxy Link to heading
For various application I run on the server, I create separate directories in /home/olex. Let’s look at one of the simplest
possible apps: a web server with some static content.
Single-container applications Link to heading
To run such a server, one could use Apache, Lighttpd or another Nginx. I prefer to use things I know, and Nginx is plenty small
and fast as a static content server, so that’s what I go with. Here’s the docker-compose.yml for such an “application”, if you
can even call it that:
version: '3'

services:
  nginx:
    image: nginx:alpine
    expose:
      - "80"
    environment:
      - VIRTUAL_HOST=static.domain.tld
      - VIRTUAL_PORT=80
      - LETSENCRYPT_HOST=static.domain.tld
      - LETSENCRYPT_EMAIL=email@somewhere.tld
    volumes:
      - /home/olex/static/files:/usr/share/nginx/html:ro
    networks:
      - proxy
    restart: unless-stopped

networks:
  proxy:
    external:
      name: nginx-proxy
Let’s go through this point by point.
There’s a single service,
nginx, running the tinynginx:alpineimage. We don’t need more than that to serve some static content.There are no ports forwarded to the host, but port 80 is exposed - this is necessary so
nginx-proxycan forward to it.Environment variables set all configuration values needed by
nginx-proxyandletsencrypt:VIRTUAL_HOSTtellsnginx-proxyunder which domain should this container be reachable.VIRTUAL_PORTtellsnginx-proxywhich port to forward requests to. In this case it’s 80 as is usual for a HTTP server, it could be any other port - e.g. various Node.js apps typically serve up on port 3000.LETSENCRYPT_HOSTtellsletsencryptthat this container’s traffic should be SSL encrypted, and which domain to request a Let’s Encrypt certificate for. It is a bit redundant toVIRTUAL_HOST(I can’t think of a situation where you’d want them to be different), but that’s how the proxy containers work.LETSENCRYPT_EMAILis used to tell Let’s Encrypt where to send certificate expiration notices. Typically this never happens, becauseletsencryptauto-renews certificates as necessary. If you get such an email and you haven’t taken the service down, you’ll at least know something’s not working properly.
/home/olex/static/fileshost directory is mounted to the default server root location insidenginxin read-only mode, allowing it to serve those files but not modify them (one can never be too careful).Container is assigned to the same external network as used above. This allows
nginx-proxyto forward requests despite this being a separate Compose application, that would normally be completely isolated from other containers on the host.
Multi-container applications Link to heading
Most applications you might want to deploy consist of several containers - say, a database, a backend service that does some processing,
and a frontend. Of those containers, you may only want the frontend to be accessible from the outside, but the three should be able
to talk to each other internally. A docker-compose.yml for such a setup might look something like:
version: '3'

services:

  frontend:
    image: frontend-image:latest
    expose:
      - "3000"
    environment:
      - VIRTUAL_HOST=awesomeapp.domain.tld
      - VIRTUAL_PORT=3000
      - LETSENCRYPT_HOST=awesomeapp.domain.tld
      - LETSENCRYPT_EMAIL=email@somewhere.tld
      - BACKEND_HOST=backend
    networks:
      - proxy
      - app

  backend:
    image: backend-image:latest
    environment:
      - DB_HOST=db
    networks:
      - app

  db:
    image: postgres:11
    volumes:
      - /opt/app-db:/var/lib/postgresql/data
    networks:
      - app

networks:
  proxy:
    external:
      name: nginx-proxy
  app:
Things of note here:
Only the
frontendcontainer is put into theproxyexternal network, because it’s the only one that needs to talk tonginx-proxy. It’s also the only one with the environment variables for proxy configuration. The containers that are only used internally in the app don’t need thosebackendanddbcontainers are put in a separateappnetwork, that is defined additionally undernetworks. This serves in place of a default network that Compose would normally create for all containers defined in thedocker-compose.yml- except once you define any network manually, the default network doesn’t get created anymore, and so ourbackendanddbcontainers would be completely isolated. With theappnetwork, they can talk to each other and tofrontendnormally.
As you can see, the setup is not very complicated. The only things to add to your normal docker-compose.yml of any multi-container
app are the networks and environment variables for the frontend container.
Multiple proxied frontend containers Link to heading
You can have multiple containers within a single Compose application that you want to make available via the proxy - for example,
a public frontend and an administrative backoffice. You can configure as many containers inside one docker-compose.yml with
the proxy network and necessary environment variables as you need. The only limitation is that every container needs to run
on a separate VIRTUAL_HOST.
For example, you could run your public frontend at awesomeapp.domain.tld and the admin backend to that at admin.awesomeapp.domain.tld.
In conclusion Link to heading
I’ve been running this setup in various forms for a while now, and it seems to do its job admirably. Adding new applications
is as easy as writing a docker-compose.yml and running docker-compose up -d - all configuration happens automagically and
fairly quickly, and my shiny new app/website/whatever is quickly available and SSL secured. There are also fairly significant
custom configuration options supported by nginx-proxy that I haven’t delved into in this introductory article - if you’re
interested, go through their README, it’s all fairly easily done when needed.
I hope this could help someone aside from myself. Hit me up on Twitter if you found this guide helpful, or if you have any comments at all.
Also check out the follow-up post, where I describe how I use
this setup in conjunction with GitLab CI to quickly deploy my various side projects with a single git push.